


Table Of Contents

Efficient concatenation of datasets is a frequent requirement in the realm of data management with SAS. One of the most effective tools for this task is PROC APPEND in SAS. In this article, we will take an in-depth look at PROC APPEND in SAS, and provide an overview of its syntax, advantages, and best practices for optimal data manipulation.
If you are familiar with SAS, you know that appending datasets is a common task. Although you can use the DATA step to concatenate datasets, there is a more efficient way to do it.
What is PROC APPEND in SAS?
PROC APPEND in SAS allows you to add observations from one dataset (known as the source) to another dataset (known as the target). Unlike the DATA step, PROC APPEND is optimized for this specific task, making it faster and more efficient.
Basic “Syntax”:
PROC APPEND BASE=target_data DATA=source_data;
The basic syntax of PROC APPEND is straightforward. You specify the target dataset with the BASE= option and the source dataset with the DATA= option.
It’s like “writing”:
So, what’s the point? use SET and your problem is solved…
data class;set class3 class2;run;
Comparison with SET Statement
In this example above, the class dataset is created by combining class3 and class2. However, if class3 doesn’t exist, this will result in an error, and your program will crash.
Advantages of PROC APPEND
This is where PROC APPEND shines. If the base dataset (class3 in this case) doesn’t exist, PROC APPEND will automatically create it for you. This is particularly useful when you’re dealing with dynamically generated datasets.
proc append base=class3data=class2;run;
In this example, even if class3 doesn’t exist, PROC APPEND will create it and append the data from class2.
Efficiency
Another advantage of PROC APPEND is efficiency. When you use the SET statement, SAS has to read through both datasets, which can be time-consuming for large datasets. PROC APPEND, on the other hand, directly appends the source dataset to the target dataset without reading through them, making it faster.
To further minimize the time involved in appending datasets, it’s a good practice to use the larger dataset as the BASE dataset. This way, you’re only copying from the smaller dataset, which is quicker.
Limitations
Let’s discuss the limitations of the PROC APPEND.
Two Datasets Only
PROC APPEND in SAS is designed to work with only two datasets at a “time”: one BASE dataset and one DATA dataset. If you have more datasets to append, you’ll have to run multiple PROC APPEND steps.
Appending Two Datasets with Similar Structure
Let’s go through an example to see PROC APPEND in action.
data class1;input Name $ Age Height;datalines;John 20 170Jane 22 160;run;title "Class 1 dataset";proc print;data class2;input Name $ Age Height;datalines;Emily 21 165Mark 23 175;run;title "Class 2 dataset";proc print;

Proc Append “Code”:
PROC APPEND BASE=class1 DATA=class2;RUN;
"NOTE": Appending WORK.CLASS2 to WORK.CLASS1."NOTE": There were 2 observations read from the data set WORK.CLASS2."NOTE": 2 observations added.
After running this code, class1 will have the observations from class2 appended.
Append Data Sets with Different Column Names
In SAS, appending data sets with different column names can be a bit tricky using PROC APPEND because it expects the variables (columns) in the BASE= and DATA= data sets to match. If the variable names don’t match, PROC APPEND will not work as expected.
However, you can work around this limitation by using a DATA step to rename the variables in one of the data sets so that they match the other. Once the variable names are the same, you can then use PROC APPEND to concatenate the data sets.
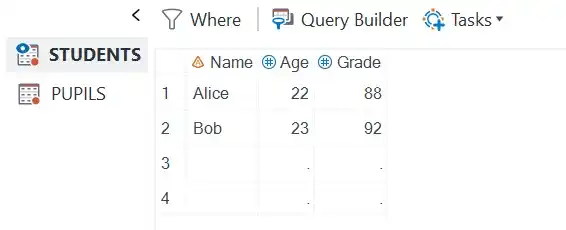
Let’s consider two data “sets”: students and pupils. The students data set has variables Name, Age, and Grade, while the pupils data set has variables StudentName, StudentAge, and StudentGrade.
First, create the “datasets”:
data students;input Name $ Age Grade;datalines;Alice 22 88Bob 23 92;run;data pupils;input StudentName $ StudentAge StudentGrade;datalines;Carol 21 90Dave 20 85;run;
If you attempt to merge the pupils dataset with the student dataset, you may encounter warnings and errors as seen in the log.

If you are looking at the error line, you might be considering using the force option. It’s natural to want to bypass the error when you encounter an error message. However, you should be careful when using the FORCE option as it can have unintended consequences on your output.
For example, you may notice that some rows are missing in your ‘student’ dataset.
To verify these discrepancies, you can check the SAS log for more details.
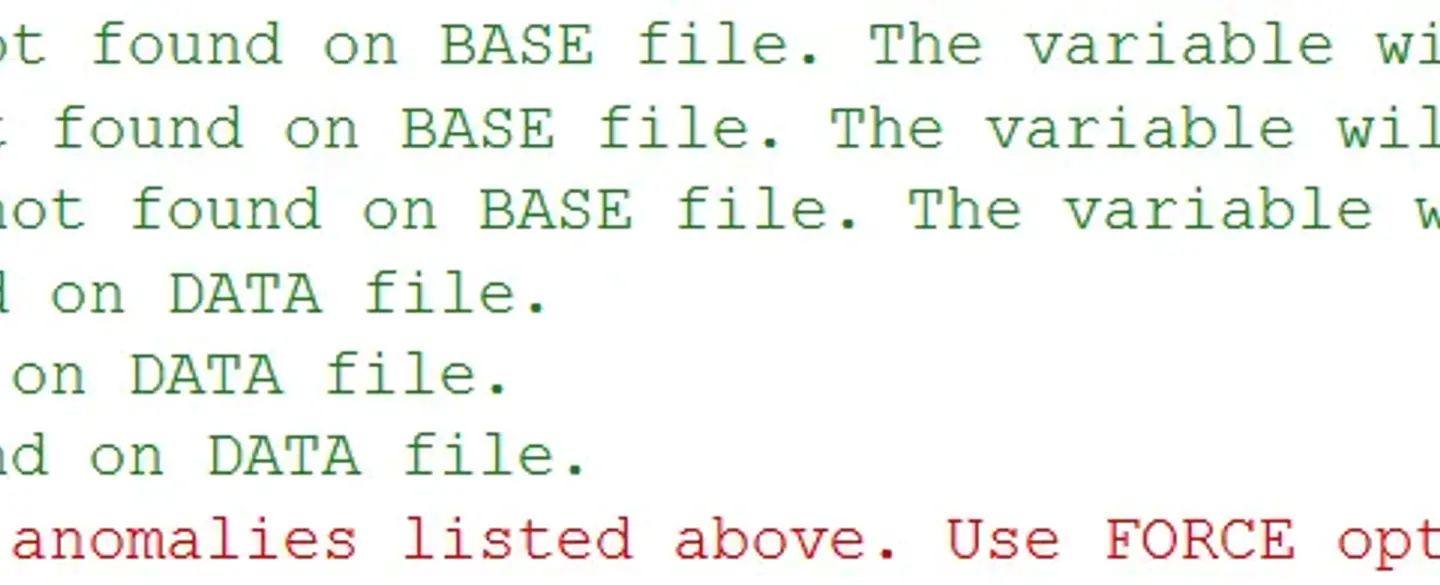
"WARNING": Variable StudentName was not found on BASE file. The variable will not be added to the BASE file."WARNING": Variable StudentAge was not found on BASE file. The variable will not be added to the BASE file."WARNING": Variable StudentGrade was not found on BASE file. The variable will not be added to the BASE file."WARNING": Variable Name was not found on DATA file."WARNING": Variable Age was not found on DATA file."WARNING": Variable Grade was not found on DATA file.
The FORCE Option in PROC APPEND
The FORCE option in PROC APPEND allows you to append datasets even when the variable names or types don’t match. While this may seem like a convenient way to bypass errors, it comes with its own set of risks, including unexpected results like missing rows or mismatched data.
How FORCE Works
When you use the FORCE option, SAS will suppress the usual errors and warnings that you would get if the BASE= and DATA= datasets have different variables. Instead, it will append the datasets as best as it can.
proc append base=students data=pupils force;run;
Risks
Missing Rows: If the
DATA=dataset contains variables not found in theBASE=dataset, those variables will be dropped, and the corresponding rows might appear as missing in the output.Data Integrity: Using
FORCEcan compromise the integrity of your data. You might end up with mismatched or mislabeled data if you’re not careful.
Verifying in the Log
After running PROC APPEND with the FORCE option, it’s crucial to check the SAS log for any notes or warnings. The log will indicate what variables were kept, what were dropped, and any other issues that might have occurred during the append operation.
In summary, while the FORCE option can be useful in some scenarios, it should be used cautiously. Always verify the output and consult the SAS log to ensure that the data is as expected.
Variable Renaming
As mentioned in the previous example, it’s often better to rename variables so that they match, rather than using FORCE.
Now, before appending, we’ll create a new data set pupils_renamed where we rename the variables to match those in ”students“:
data pupils_renamed;set pupils;Name = StudentName;Age = StudentAge;Grade = StudentGrade;drop StudentName StudentAge StudentGrade;run;
Finally, use PROC APPEND to append pupils_renamed to ”students“:
proc append base=students data=pupils_renamed;run;
Now, the students data set will contain the combined data from both students and pupils, with the variables appropriately renamed.
This approach allows you to append data sets with different column names by first standardizing the variable names.
Append Data Sets with Different Column Types
In SAS, appending datasets with different column types can be challenging. PROC APPEND expects the variables in the BASE= and DATA= datasets to have the same types. If the types don’t match, PROC APPEND will produce an error.
This article explains how concatenation works between data sets with different variables…
Workarounds
Convert Variable “Types”: Before appending, you can create a new dataset where you convert the variable types to match those in the other dataset.
Let’s consider two “datasets”: class_numeric and class_char. The class_numeric dataset has a numeric variable Grade, while the class_char dataset has a character variable Grade.
data class_numeric;input Name $ Age Grade;datalines;Alice 22 88Bob 23 92;run;data class_char;input Name $ Age Grade $;datalines;Carol 21 90Dave 20 85;run;
Convert Variable Types
Before appending, create a new dataset class_char_converted where the Grade character variable is converted to a numeric variable named.
data class_char_converted;set class_char;Gradenum=input(Grade,3.);drop grade;rename gradenum=grade;run;
Now, use PROC APPEND to append class_char_converted to class”_numeric”:
proc append base=class_numeric data=class_char_converted;run;
Selecting Observations for Concatenation
PRPC APPEND in SAS, by default concatenates all rows from the source (DATA=) dataset to the target (BASE=) dataset. However, there may be scenarios where you only want to append a subset of rows based on certain conditions. This can be achieved using an optional WHERE clause as a dataset option.
How to Use the WHERE Clause
The WHERE clause allows you to specify logical conditions that filter the observations from the source dataset before appending them to the target dataset. The clause is specified as a dataset option in the DATA= statement.
Syntax
Here’s the basic syntax for using a WHERE clause with PROC APPEND:
proc append base=TargetDataset data=SourceDataset(where=(condition));run;
Let’s consider an example where we have two “datasets”: class_all and class_freshmen. We want to append only the rows from class_freshmen where Year is 1 to class_all.
data class_all;input Name $ Age Year;datalines;Alice 22 4Bob 23 3;run;data class_freshmen;input Name $ Age Year;datalines;Carol 18 1Dave 19 1Eve 20 2;run;
Now, use PROC APPEND with a WHERE clause to append only the freshmen (where Year is 1) to class_all:
proc append base=class_all data=class_freshmen(where=(Year=1));run;
Appending to A Zero-Observation Data Set
In some scenarios, you may want to create a master data set with predefined attributes but no observations. This is particularly useful when you want to enforce integrity constraints on the variables that will be added later.
Appending to a zero-observation data set is different from appending to a non-existent data set. The attributes from the input data set are not cloned into the master data set.
Zero-Observation Data Set
A zero-observation data set is essentially a data set structure without any actual data. It contains variable names, types, and other attributes but no rows.
Attributes and Integrity Constraints
When you append to a zero-observation data set, the attributes of the master data set are retained. This is useful when you have set integrity constraints or other attributes that you want to preserve.
GETSORT Option
If your input data set is sorted and you want to retain the sort indicator when appending to a zero-observation data set, you can use the GETSORT option. This option is only applicable when appending to zero-observation data sets.
proc append base=MasterDataSet data=InputDataSet getsort;run;
This will ensure that the sort indicator from the InputDataSet is retained in the MasterDataSet.
Linguistic Collation Sort
The GETSORT option also works for linguistic collation sort information, ensuring that the sorting order is maintained even when dealing with different languages or special characters.
“Example”:
Let’s say you have a master data set with zero observations but with defined attributes and an inputdataset that is sorted by age.
data MasterDataSet;length Name $ 20 Age 8 Grade 8;stop;run;title 'Attributes of masterdataset Before Append';ods select Variables;proc contents data=masterdataset;run;ods select default;/* Create InputDataSet with sample data */data InputDataSet;input Name $ Age Grade;datalines;Alice 22 88Bob 23 92Carol 21 90Dave 20 85;run;/* Sort InputDataSet by Age */proc sort data=InputDataSet;by Age;run;title 'Attributes of InputDataset';ods select Variables;proc contents data=InputDataSet;run;ods select default;
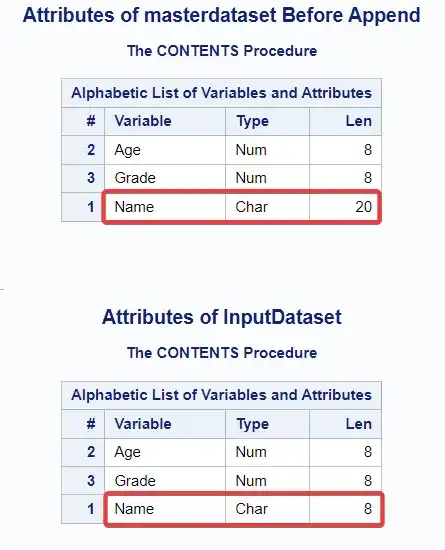
We have use Proc Contents procedure to print the variable attributes of both the datasets. Notice the different attributes of the Name variable.
To append the sorted InputDataSet to MasterDataSet while retaining the sort indicator, you can “use”:
proc append base=MasterDataSet data=InputDataSet getsort;run;title 'Contents of Masterdataset';proc print data=MasterDataSet;run;title 'Attributes of masterdataset After Append';ods select Variables;proc contents data=masterdataset;run;ods select default;
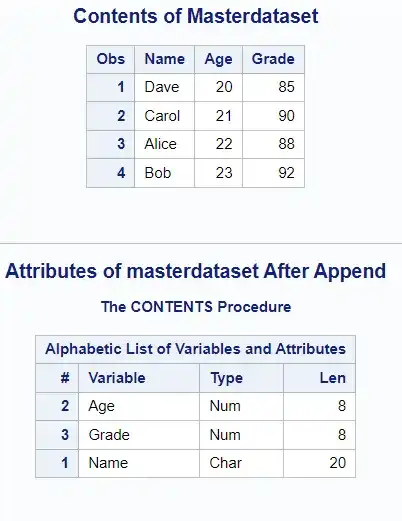
Appending to a zero-observation data set allows you to maintain predefined attributes and integrity constraints. Using the GETSORT option ensures that the sort indicator is also retained.
The Issue with Deleting Observations
When you delete observations from a SAS data set, the observations are not physically removed; they are simply marked as deleted. This can lead to inefficiencies, especially when working with large data sets.
Efficient Way to Create Zero-Observation Data Sets
A more efficient approach to creating a zero-observation data set is to create a new data set with the desired attributes from an existing data set, rather than deleting all the observations from the existing data set.
Using PROC APPEND with OBS=0
One straightforward way to accomplish this is to use PROC APPEND with the OBS=0 data set option on the input data set. This will create a new data set with zero observations but with all the attributes (like variable names, types, and lengths) of the original data set.
/* Create a new zero-observation data set from an existing data set */proc append base=ZeroObservationDataSet data=ExistingDataSet(obs=0);run;
In this example, ZeroObservationDataSet will be a new data set with zero observations but with the same attributes as ExistingDataSet.
Integrity Constraints
When you use this method, general integrity constraints from the existing data set are added to the new zero-observation data set. However, referential integrity constraints are not carried over.
Conclusion
From a conceptual and practical standpoint, PROC APPEND in SAS is the more efficient technique for
concatenating SAS data sets. PROC APPEND is a best practice over the DATA STEP for combining.
SAS data sets vertically.